And it is that this type of connection is becoming more basic, whether for work or leisure, the truth is that it is the most comfortable way of being connected to the Internet. Over time, its signal capacity and speed have increased, causing it to no longer be essential to be connected by Ethernet cable to have good connectivity.
Causes of WiFi disconnecting
There are not a few users of both Windows 10 and Windows 11 who have gone through problems with WiFi connection, something that can happen for a wide variety of reasons, being one of the most common errors that we can find. This causes us to suffer frequent disconnections causing us to lose access to the Internet.
This annoying problem can occur for several reasons. The most common can be due to the drivers, since they can be damaged or outdated, so we must always make sure we have updated drivers, in order to correct errors, compatibility problems, etc. It can also be due to a compatibility problem with the version of our operating system, so we must always keep it updated. Also, a problem with the power management.
Other causes may be related to the fact that there are too many users connected, the WiFi, we are out of the range of the signal and the connection cables are damaged or the firmware of the modem is outdated. We are going to focus on the software section and we are going to see different ways we have to solve this annoying problem.
What to do to fix it
Next, we are going to see different actions that we can carry out to definitively end the problems of random disconnection from our WiFi network.
Update the network adapter
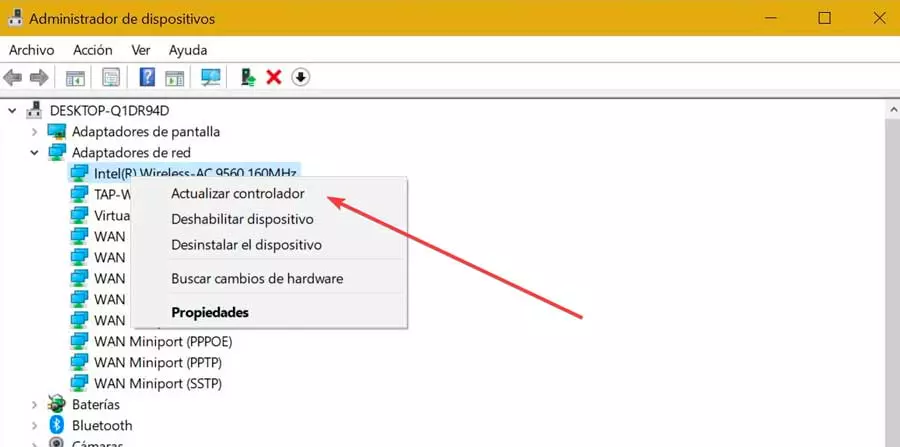
As we have commented, if the network drivers of our computer are found damaged or outdated, could be the main cause for sudden disconnections. Therefore, we must always try to keep them updated to their latest available version, something that we can do automatically from the Device Manager.
To do this we must press the keyboard shortcut “Windows + X” and select Device Manager from the menu. Later we expand the “Network adapters” section. We right-click on our adapter and select “Update driver” from the list. Later we choose Search for drivers automatically and let Windows update the drivers.
In case Windows is not able to install it correctly then we must carry out the process manually. If, for example, our Bluetooth is from Intel, we can download it from its official website. Once the drivers have been downloaded, we go back to the previous steps, but this time we choose to reinstall the device manually.
Change network profile
Another reason why these connection cuts automatically occur are related when a WiFi network is found marked as Public instead of Private, so it may be useful to change the network connection. And it is important to maintain a correct configuration for a good connection because otherwise it can cause these annoying problems.
To do this, we press the keyboard shortcut “Windows + I” to access the Settings menu. Then we click on “Network and Internet” and then on the “WiFi” section in the side menu. Later we select “Manage known networks”, we click on our network and then on the option to forget password.

Now click on the WiFi icon in the system tray and enter the password. Later, the system will ask us if we want our PC to be recognizable or not. We click on the Yes button to set it as Private.
Change Power Management
Another reason that explains the appearance of this connection problem may be related to changes we have made in the configuration of the Power Management or that we have enabled a battery saving mode. This is useful especially if we have a laptop and we want to save energy when we are not using it, but which in turn causes us these automatic disconnection problems. In order to solve it, we can follow the following steps.

We press the keyboard shortcut “Windows + X” to access the Device Manager. Later we expand the network adapters menu and double click on our adapter to open its properties. Next, click on the “Power Management” tab and uncheck the Allow the computer to turn off this device to save energy box. We click OK to save the changes and check if we get a more stable connection.
Reset Automatic WLAN Settings
Service Automatic WLAN configuration It is responsible for connecting Windows with our router. In the event that it has a problem when starting, it may prevent the connection. Therefore, we can try to configure it to run automatically at startup. To do this we must press the keyboard shortcut Windows + R and launch the Run command. Here we write services.msc and press Enter.
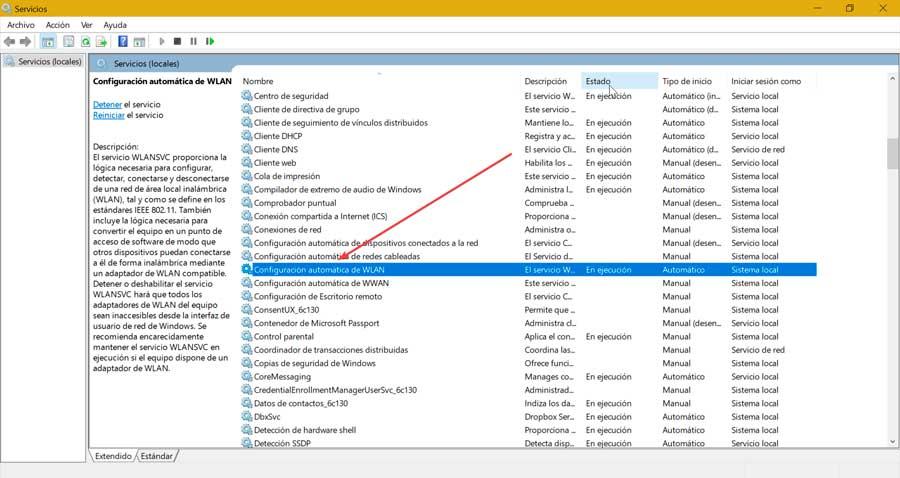
We move through the menu and right-click on the WLAN Automatic Configuration to select its Properties. In the new window we select in «Startup type», the «Automatic» and we press Apply and OK to save the changes. Finally, we reboot the system and check if the connection drop problems have been solved.

Use the Network Troubleshooter
Windows has your own troubleshooter, a tool that can help us solve any problem related to the Internet and the WiFi connection. That is why we cannot ignore its use when trying to solve our problem.
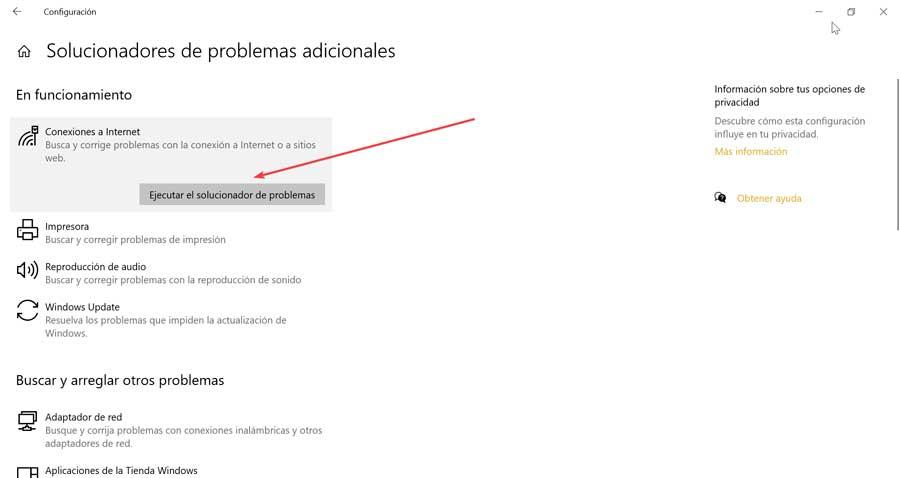
To do this, press the keyboard shortcut “Windows + I” and access the Settings menu. Here, click on “Update and security”. Subsequently we select “Troubleshoot” in the left side menu and click on Additional troubleshooter, which we find on the right. Then we click on “Internet Connections” and “Run the troubleshooter.” Using it should fix any system level problems.
Reset the network
In case none of the above has worked, we can try to reestablish the network connection Windows. With this we will be able to reinstall all the network adapters that have been configured in our system. This will reset the network settings to their default values.

To do this, press the keyboard shortcut “Windows + I”, which will open the Settings menu and click on the “Network and Internet” option. In the Status tab, we scroll to the bottom and click on the “Network Reset” option. Once restored, we can only reconnect our PC to the usual network and check if this solves our problem.