Why Hard Drives And SSDs Losing Performance
As with everything, for the computer to function properly, without problems, it is necessary to carry out essential maintenance. As we use the computer, and depending on what we do with it, these discs fill up with data, some personal and necessary, but others useless, garbage, which only serve to occupy space. But this is not the only reason these drives start to perform worse.
In the case of hard drives, for example, it greatly affects the fragmentation. When we copy a large file, it is not usually copied in its entirety to the end of the disk, among other things because, depending on how full we have it, we will not have room. Instead, it breaks down into very small parts and fills in the gaps between other files. When opening that file, the disk head has to go through all the gaps to read the entire file, and that takes a long time. This, for example, does not apply to SSDs, as access is random, not sequential.
There may also be other factors that affect the performance of drives and SSDs. For example, the presence of processes and services in Windows that are generating read and write cycles (such as indexing), and even having little free space, which always translates into a considerable loss of performance.
Therefore, we are going to see how we can improve the speed of hard drives and SSDs so that the computer can function without problems.
Improve performance and increase your speed
There are several ways to optimize and improve the performance of drives and SSDs. Some of them are only valid for hard drives, while others can be used equally for both platter drives and solid state drives. Let’s see what all of them are.
The more free space the better
One of the reasons drives can run slower than normal it is due to having little space available. The more free space there is, the more direct data can be copied, but when it begins to shrink, it becomes increasingly difficult to find spaces to save the data, and that is when you have to resort to fragmentation.
This is much worse on conventional hard drives, due to their sequential access. Therefore, if we want our disk to work much better, the ideal is to always have plenty of free space so that our new data is copied without problems. In addition, Windows needs to always have a certain amount of space available (about 32 GB) and, if it does not have them, in addition to going slower than normal, we will have problems updating.
To free up disk space we can use many options. For instance:
- Delete files that we don’t need, or copy them to another hard drive.
- Empty the recycle bin.
- Clean temporary files and junk with Storage Sense.
- Remove old versions of Windows.
- Disable hibernation.
- Moving programs or games that take up a lot of space to other drives.
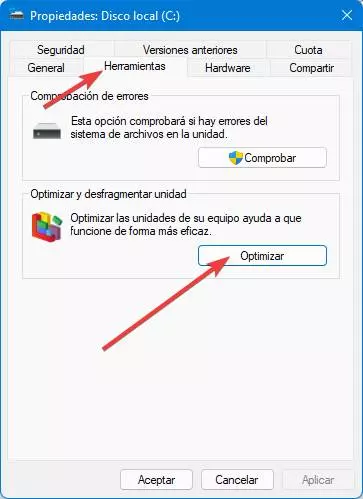
Defragment and optimize drives
The fragmentation It is a problem that mainly affects conventional hard drives. SSDs, having random access to data (and not having to go through a disk with a head) are not affected as much by it. What’s more, defragmenting an SSD is never recommended as it can get damaged.
Modern versions of Windows take care of defragmenting the drives automatically without us having to do anything. In addition, the operating system is capable of automatically detecting which are SSDs and which are hard drives, to perform the appropriate optimization in each case and avoid damaging them.
We can check the status of each unit by opening the properties of the hard disk by right-clicking on it, entering the “Tools” section. From there we can also perform manual defragmentation / optimization, or change the schedule.
Enable write cache
Again, another setting that can greatly influence the performance of normal hard drives, although not as much on SSDs. This cache is a space of temporary storage that have the drives where the data is quickly copied before burning it to the disc as such. The cache is much faster than normal storage, although it is much more limited in capacity due to its price. In addition, we run the risk of losing all the data stored in the cache if the power goes out before it is finished copying it to the disk.
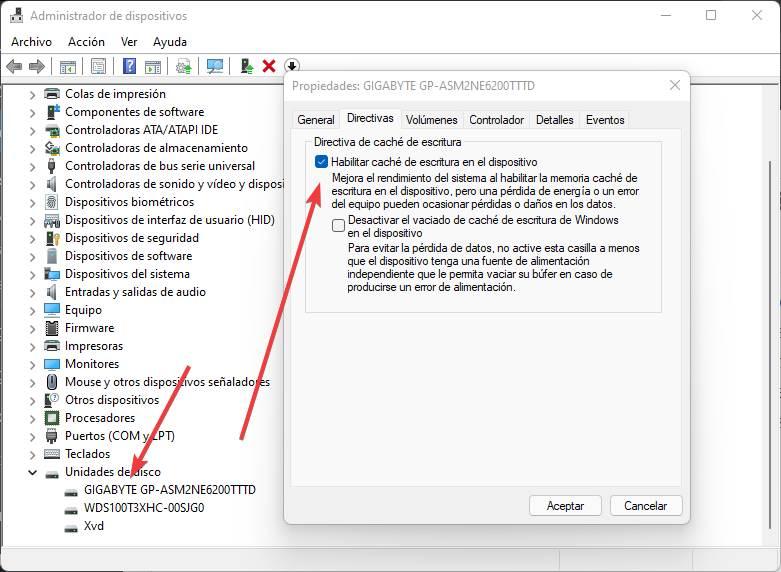
We can check if this cache is activated, and activate it if it is not, from the Windows device manager, opening the properties of the hard disk. In the “directives” tab we can see the write cache policy, and activate it for greater speed, or deactivate it to avoid data loss.
Adjust pagination
The paging, or swap file, is a file that Windows creates on the hard disk, or SSD, to be able to copy parts of the RAM that are not used when there is very little free space on it. This file takes up a considerable space, and also implies a considerable loss of performance.
If we have enough RAM memory (32 GB, 64 GB, etc), we can deactivate this paging, since we will never use it. However, if we have little memory, it is necessary to have it. Of course, we can move it to another hard disk that we have connected to the computer so that its use does not affect the read and write cycles of our main disk.
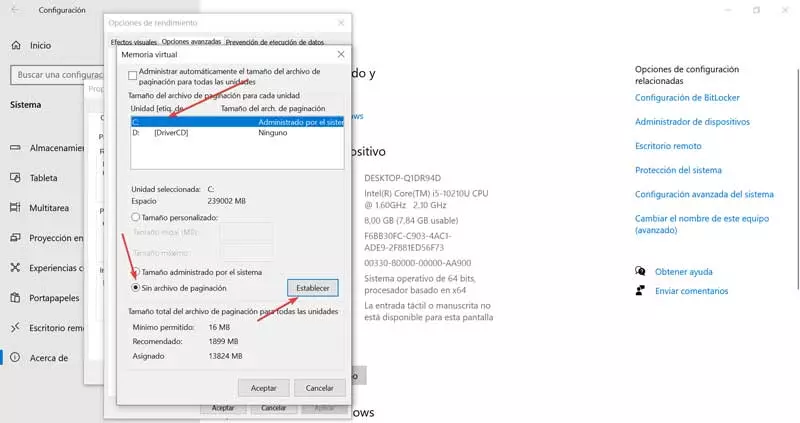
There are many myths about him using paging on SSD. Nowadays, it is safe to use paging on SSD drives, and besides, doing so has a much better impact than using them on a normal hard drive, basically because they are faster.
Activate TRIM
The TRIM is an NTFS storage-level technology that allows the operating system to send instructions directly to the SSD to perform certain tasks, such as deleting files. In this way, when we delete a file, or when it is no longer needed, the SSD knows it, and can delete it and mark the space as “available” directly to prepare for new reads.
We can check the status of this function by executing the following command in a CMD window with Administrator permissions:
fsutil behavior query DisableDeleteNotify
If the returned value is “0”, then TRIM is activated. Conversely, if the value is “1”, then it is disabled. And we can activate it (as long as the unit supports it) by executing the following in the same CMD window:
fsutil behavior set DisableDeleteNotify 0
Now this feature is enabled on the SSD, and we should see that it now starts to work better.